This post was originally published in December 2022. Last updated: September 2025.
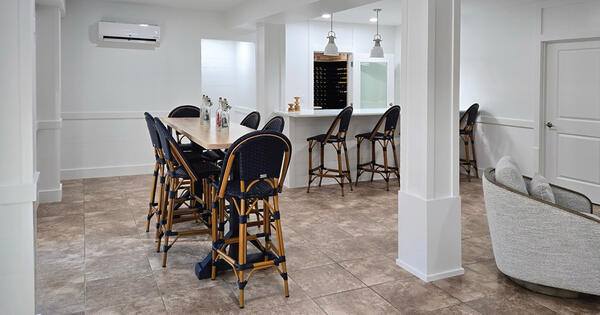
If you’re considering a basement renovation, you’re not alone — finishing or refinishing a basement is one of the most popular home improvement projects for homeowners looking to add usable living space. From home gyms to offices to rental units, a finished basement opens up countless possibilities.
But before you begin, you’ll need to think about materials, layout, and budget. One of the smartest choices you can make is selecting the right basement wall panels to ensure durability, moisture resistance, and a polished finish that lasts. Here’s a step-by-step guide, complete with finishing basement tips, to help you get started.
What Steps Do I Need to Take to Finish My Basement?
When you look around at your unfinished basement, it may feel like an impossible task to turn it into a livable space for you and your family. There’s so much work to do, especially if you’re planning on tackling the project yourself.
The good news? Finishing a basement doesn’t have to be overwhelming:
- Treat your basement walls, ceiling, and flooring as three separate projects.
- Your basement walls will likely need to be insulated and framed before you install basement wall panels or drywall.
- Your basement ceiling can be finished using a drop ceiling kit or by installing panels directly to the joists.
- Your basement floors will simply need subflooring installed before adding vinyl, tiles, or carpet on top.
The tools you’ll need depend on the materials you choose, but you can expect to need a circular saw, caulk gun, hammer, nail gun, nails, tape measure, masonry drill, insulation adhesive, and utility knives. Be sure to have gloves, goggles, and other safety gear on hand to protect yourself throughout the renovation.


What Do I Need to Consider Before Starting My Basement Renovation?
Before starting your renovation, you’ll need to apply for building permits and check your local building code. If your basement doesn’t meet code for ceiling height or exits, you’ll likely have to bring in professional reinforcements to help you complete your project.
Your local building code will also outline rules and special considerations concerning vapor barriers, fire performance, and more, which may affect the materials you buy and the steps you need to take to finish your basement. When in doubt, consult a professional contractor for guidance.
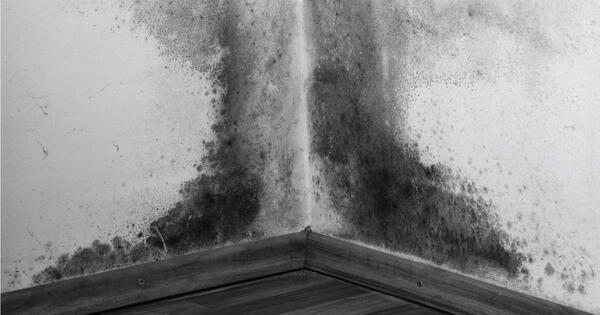
While planning your renovation, you should also test your basement for moisture, humidity, and dampness. If the levels are high, you’ll likely need to take steps to waterproof the area and also choose materials that are water and moisture resistant. This is one of the most overlooked yet important basement finishing tips.
Choosing the Right Materials: Why Are Basement Wall Panels Better Than Drywall?
What are the best materials for finishing a basement? The short answer: materials that can handle moisture, resist mold, and stand the test of time. That’s why choosing the right basement wall panels is one of the most important decisions you’ll make during your renovation.
Basements are naturally prone to dampness, humidity, and even minor flooding — all conditions that can quickly damage traditional building materials. Many homeowners default to drywall, but while drywall may work well in above-grade spaces, it often struggles in below-grade environments.
The challenges with drywall in basements include:
- Drywall absorbs moisture easily, which can lead to swelling, crumbling, and costly repairs.
- It’s a breeding ground for mold and mildew when exposed to dampness.
- Finishing drywall requires taping, mudding, and sanding — a time-consuming process.
If you’re investing in a basement renovation, it pays to choose a material that’s built to last. Basement wall panels like Trusscore Wall&CeilingBoard offer a smarter alternative:
- Moisture and water-resistant: Panels won’t absorb water or warp, even in high-humidity conditions.
- Durable and impact-resistant: Strong enough to withstand daily wear and tear, making them ideal for multipurpose basements.
- Easy to clean: A simple wipe-down keeps panels looking new, no repainting required.
- Quick and easy to install: Panels interlock with a tongue-and-groove system, cutting down installation time significantly.
| Feature | Drywall | Trusscore Basement Wall Panels |
|---|---|---|
| Moisture Resistance |
Absorbs water, prone to mold |
100% moisture and water-resistant |
| Durability |
Easily dents, degrades, and crumbles |
|
| Maintenance |
Requires repainting and repairs |
|
| Installation |
Labor-intensive (mud, tape, sand) |
Quick tongue-and-groove install |
By choosing durable basement wall panels over traditional drywall, you’ll not only save yourself from headaches down the road but also create a space that’s brighter, cleaner, and built for long-term performance.
How Do I Finish My Basement Walls and Ceiling?
Your basement walls will require the most work to finish, as you’ll need to insulate and frame them before installing drywall or basement wall panels.
How Do I Insulate My Basement Walls?
If you’re handling your basement reno without any outside help, rigid foam insulation is a great, DIY-friendly, and moisture-resistant option to insulate your basement. Several companies sell rigid foam insulation, but you’ll find their installation processes are very similar and commonly include the following steps:
- Caulk all the seams between ceiling and rim joists with silicone caulk.
- Measure the wall from the floor to the ceiling and mark the measured height on the rigid foam panel. Using a utility knife, score the panel and snap the board along the scored line.
- Apply a spray foam adhesive to the back of the rigid foam insulation panel, especially in the corners and along the edges.
- Place the panel against the wall and push firmly. Cut the next panel and place it securely next to the first one.
- Continue to install the panels along the walls following steps one through four, making sure to mark and cut out areas for electrical outlet boxes before installing.
- Cover seams with tape and fill in large holes or cracks with low-expanding spray foam.
If your wall studs have already been installed, you’ll likely want to opt for fiberglass insulation or spray foam insulation instead:
- Fiberglass insulation is sold in batts or rolls that are designed to fit standard walls and ceilings with framing spaced 16 or 24 inches apart on-center. It’s easy to install yourself, however, fiberglass insulation can trap moisture and lead to mold or mildew growth.
- Spray foam insulation is a polyurethane foam that’s sprayed in the space between basement wall studs with a hose and gun and then expands. While we recommend hiring a certified contractor or technician to install spray foam, you can buy do-it-yourself kits online or at your local hardware store. During installation, be sure to follow the instructions provided with your kit from the manufacturer.
Important note for basements!
If your basement has foam insulation, you’ll need to install a thermal barrier before adding Trusscore panels. Foam is combustible, so building codes require a protective layer — typically gypsum board, intumescent paint, or another approved material — to cover it. Trusscore Wall&CeilingBoard can’t replace this layer.How Do I Frame My Basement Walls?
Once you’ve installed the insulation, it’s time to frame your walls. This is an important step that must be completed before installing wall panels or drywall:
- Draw a chalk line on the floor four inches from the wall.
- Measure the length of your wall and cut two 2x4s to size — these will be your top and bottom plates.
- Subtract 3 inches from the previous measurement and cut your studs to size. This accommodates the thickness of the two 2x4 plates, which are 1 ½” each.
- Set the top and bottom plates side by side on the floor to mark spacing for the studs. The first stud will be offset by ¾”. Mark every 16” to indicate the centers of the studs.
- Place your bottom plate along the bottom of the wall, aligning it with the chalk line drawn in the first step. Secure the bottom plate using a masonry drill and nails, adding a supporting nail at each 16” mark.
- Using a nail gun instead of a masonry drill, install the top plate by following the same instructions for the bottom plate. If your ceiling joists run parallel to the top plate, add a blocking board between the nearest joists every 16 inches to attach the top plate to.
- Align the studs with the 16-inch marks made earlier and insert nails on each side of the stud at a 45-degree angle.
- Repeat steps one through seven until all your basement walls have been framed.
Before installing wall panels or drywall, you’ll want to complete any electric, plumbing, or air duct work that will run inside the walls. This part of your project should not be DIYed. Hire a certified professional to complete it for you.
How Do I Install Trusscore Wall&CeilingBoard on My Basement Walls?
Whether you’re installing Trusscore Wall&CeilingBoard vertically or horizontally, the process follows the same rhythm:
- Install the Universal Base. Measure and cut the base for the top, bottom, and sides of the wall. Align it tight to the corner with the screw flange pointing away from the wall, floor, and ceiling, then fasten it.
- Frame openings with Universal Base. If using Snap-In Trim for doors or windows, install the base around the openings.
- Install the first panel. Measure and cut the panel. For vertical installs, start in a corner with the screw flange pointing away from the wall. For horizontal installs, start at the bottom with the screw flange pointing up. Leave 1/4" clearance at panel ends and level the panel before fastening.
- Fasten panels. For vertical installs, fasten at least every 24" into studs. For horizontal installs, fasten at each stud. Use recommended screws and do not overtighten.
Join panels with Snap-In H Trim. If the wall is longer or taller than a panel, connect panels at the ends with H Trim.
Install remaining panels. Insert the tongue of the next panel into the groove of the previous panel. Press firmly and then fasten. - Check alignment. Measure from the wall or floor to the panel edges at both ends. If distances are equal, the row is straight. Adjust panels if needed.
- Fit the last panel. Cut the final panel to size according to the Ripping Panels instructions.
- Install finishing trim. Attach Snap-In J Trim or Inside Corner Cove Trim to each Universal Base.
- Repeat for other walls. Follow steps 1 to 9 for each remaining wall.
For more detailed instructions on how to install Trusscore Wall&CeilingBoard, download our Installation Guide.


How Do I Finish My Basement Ceiling?
To finish your basement ceiling, you have two choices: install a drop ceiling, or install drywall or ceiling panels directly to the joists. A drop ceiling is best if you have to cover exposed piping, wiring, or ductwork. You can buy drop ceiling installation kits online or at your local hardware store. Follow the installation instructions that are provided with the kit.
If you don’t have obstructions hanging below your joists, you can easily finish your basement ceiling using Trusscore Wall&CeilingBoard:
- Trim out the ceiling area: Cut your trim to length and install around the entire ceiling perimeter.
- Install panels perpendicular to the joist direction: Start by sliding the tongue edge of the first panel into the J Trim, leaving the screw flange exposed. Fasten the panel through the screw flange at each joist.
- Continue installing the remaining Trusscore Wall&CeilingBoard panels until complete: If your ceiling dimensions exceed the longest available panel length of 20’, use H Channel Snap In Trim to join panel sections.
For more detailed instructions on how to install Trusscore Wall&CeilingBoard on ceilings, download our Installation Guide.
Whether you’re tackling a basement finishing DIY project or hiring a contractor, finishing or refinishing a basement is one of the most rewarding ways to add value and usable space to your home. With the right materials — especially moisture-resistant basement wall panels — and some smart basement finishing tips, your basement can become a bright, functional, and comfortable extension of your home.
Your Basement Is Only As Good As the Materials You Choose

Wall&CeilingBoard
Trusscore Wall&CeilingBoard is an interlocking, interior PVC wall and ceiling panel that is lightweight, low maintenance, and outperforms alternative products like drywall and FRP.
Learn More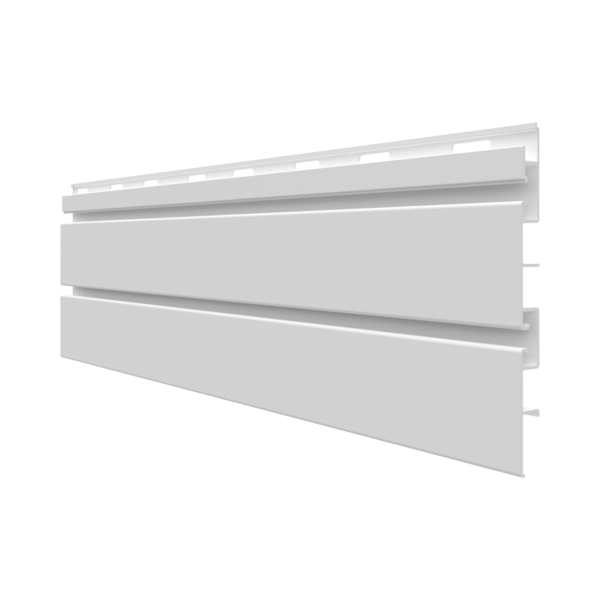
SlatWall
Trusscore SlatWall is a high-strength, on-the-wall organization system that’s easy to install and seamlessly integrates with Trusscore Wall&CeilingBoard.
Learn More