In the world of DIY construction and home improvement projects, understanding the nuances of adhesives and sealants is crucial for achieving professional-looking results.
From selecting the right products for specific applications to mastering proper application techniques and safety precautions, this blog post will guide you through everything you need to know to tackle your next project with confidence.
Sealant Types
What are the main differences between silicone, polyurethane, and acrylic sealants?
When it comes to sealants, understanding the differences between silicone, polyurethane, and acrylic options is crucial for choosing the right one for your project:
- Silicone sealants are known for their flexibility and excellent resistance to moisture, making them ideal for sealing joints and gaps in wet environments like bathrooms and kitchens. They adhere well to a variety of surfaces, including glass, metal, and ceramics, and they maintain their elasticity over time, which helps prevent cracks and leaks.
- Polyurethane sealants offer superior durability and strength, making them suitable for high-traffic areas or outdoor applications. They bond well to most materials, including wood, concrete, and metal, and they can withstand exposure to UV rays and harsh weather conditions without deteriorating. Polyurethane sealants are commonly used for sealing joints in concrete structures, such as driveways, sidewalks, and foundations.
- Acrylic sealants are more affordable and easier to work with than silicone and polyurethane options. They dry quickly and can be painted over, making them suitable for interior projects where aesthetics is important. Acrylic sealants are best suited for sealing gaps and cracks in dry or low-moisture environments, such as baseboards, trim, and interior walls.
When should I use each type of sealant?
Choosing the right sealant ensures a long-lasting and effective seal for your construction or DIY project. Use silicone sealants for wet areas like bathrooms and kitchens, polyurethane sealants for outdoor or high-traffic areas, and acrylic sealants for interior projects where quick drying and paintability are desired.
Waterproofing Sealant
Which sealant is best for waterproofing bathroom fixtures, like sinks and showers?
For waterproofing bathroom fixtures like sinks and showers, silicone sealant is the go-to option. Its superior moisture resistance and flexibility make it perfect for sealing joints and gaps in wet environments.
When applying silicone sealant around bathroom fixtures, ensure the surface is clean and dry before application. Use a caulking gun to apply a smooth, even bead of silicone along the joint or gap, then use a damp cloth or finger dipped in soapy water to smooth the sealant for a neat finish. Allow the silicone sealant to cure completely before exposing it to water to ensure a watertight seal.
How do I ensure a watertight seal around windows and doors?
To ensure a watertight seal around windows and doors, start by thoroughly inspecting the area for any gaps or cracks that may allow water infiltration. Use a high-quality exterior-grade silicone or polyurethane sealant specifically designed for sealing windows and doors. Clean the surfaces around the windows and doors to remove any dirt, dust, or old sealant residue. Apply the sealant in a continuous bead along the perimeter of the window or door frame, making sure to fill any gaps or cracks completely.
Use a caulking gun to apply the sealant evenly and smoothly, then use a wet finger or tool to smooth the sealant and ensure good adhesion to the surfaces. Allow the sealant to cure according to the manufacturer's instructions before exposing it to moisture or weather elements. Regular inspection and maintenance of the seals around windows and doors are also essential to ensure long-term waterproofing effectiveness.
Sealant Paintability
Can I paint over all types of sealants?
Painting over sealants depends on the type of sealant you use. Acrylic sealants are generally designed to be paintable, making them an excellent choice for projects where you want to match the sealant color to the surrounding surfaces or apply a decorative finish. Acrylic sealants dry quickly and form a paintable surface once cured, allowing you to paint over them with most types of paint, including latex and oil-based paints. However, it's essential to check the manufacturer's recommendations regarding paint compatibility and ensure the sealant is fully cured before painting.
On the other hand, silicone and polyurethane sealants are not typically paintable. Silicone sealants have a smooth, non-porous surface that does not adhere well to paint, while polyurethane sealants form a tough, durable bond that is difficult to paint over. Attempting to paint over silicone or polyurethane sealants may result in poor adhesion, uneven coverage, and a less durable finish.
Are there sealants specifically designed to be painted?
If painting over sealants is necessary, consider using an acrylic sealant specifically designed to be paintable. These sealants offer the flexibility and durability of acrylics while allowing for easy painting and finishing. Always follow the manufacturer's instructions for surface preparation, application, and painting to ensure the best results and long-lasting performance.
Sealant Flexibility and Movement
Are there flexible sealants for areas prone to expansion and contraction?
There are flexible sealants designed specifically to accommodate areas prone to expansion and contraction. These types of sealants are essential for joints or surfaces that experience movement due to temperature changes, settling, or other factors.
When choosing a sealant that can accommodate movement, look for options labeled as “flexible” or “movement joint sealants.” These sealants are typically formulated with elastomeric properties, allowing them to stretch and compress without losing adhesion or cracking. Silicone and polyurethane sealants are commonly used for this purpose due to their excellent flexibility and durability.
How do I choose a sealant that can accommodate movement in joints or surfaces?
Here are some key factors to consider when choosing a flexible sealant for areas prone to movement:
- Flexibility: Opt for sealants specifically formulated to withstand movement without cracking or splitting. Look for products labeled as “elastic” or “flexible” to ensure they can accommodate joint movement effectively.
- Compatibility: Ensure the sealant is compatible with the materials you're working with, such as concrete, wood, metal, or masonry. Some sealants may not adhere well to certain surfaces, so check the manufacturer's recommendations before application.
- Environmental Conditions: Consider the environmental factors that may affect the sealant, such as temperature fluctuations, UV exposure, and moisture levels. Choose a sealant that is suitable for the specific conditions of your project to ensure long-lasting performance.
- Application Method: Depending on the project requirements, you may need a sealant that can be applied with a caulking gun, trowel, or other tools. Choose a sealant that offers the desired application method for your project needs.
By considering these factors and selecting a flexible sealant that meets your project requirements, you can effectively seal joints and surfaces prone to movement and ensure a durable, long-lasting seal.
Sealant Temperature Resistance
Are there sealants suitable for extreme temperatures, such as outdoor applications?
Yes, there are sealants specifically designed to withstand extreme temperatures, making them suitable for outdoor applications where exposure to heat, cold, and weather elements is a concern. Silicone and high-temperature silicone sealants are commonly used for this purpose due to their ability to maintain flexibility and adhesion across a wide temperature range.
What sealant works best for sealing gaps around heating appliances?
Silicone sealants formulated for high-temperature applications can withstand temperatures ranging from -40°F to over 500°F (-40°C to 260°C), making them ideal for sealing gaps and joints around heating appliances, such as stoves, furnaces, chimneys, and HVAC systems. These sealants create a durable, heat-resistant barrier that helps prevent air and moisture infiltration while accommodating thermal expansion and contraction.
When sealing gaps around heating appliances, it's essential to choose a high-temperature sealant specifically designed for the intended temperature range of the appliance. Ensure the surface is clean and dry before applying the sealant, and follow the manufacturer's instructions for proper application and curing.
Additionally, consider using fire-rated or fire-resistant sealants for applications near open flames or in areas where fire safety is a concern. These sealants are formulated to resist ignition and inhibit the spread of flames and smoke in the event of a fire, providing added protection and peace of mind.
By selecting the appropriate sealant for sealing gaps around heating appliances and ensuring proper installation, you can improve energy efficiency, prevent heat loss, and maintain a safe and comfortable indoor environment.
Sealant Adhesive Strength
How do I determine the bonding strength of different adhesives?
Determining the bonding strength of different adhesives involves considering various factors such as the type of materials being bonded, the surface preparation, and the application method. Here are some general guidelines to help assess adhesive bonding strength:
- Adhesive Type: Different types of adhesives have varying bonding strengths depending on their chemical composition and properties. For example, cyanoacrylate (super glue) adhesives provide high-strength bonds for materials like plastics and metals, while epoxy adhesives offer strong, durable bonds for a wide range of substrates.
- Substrate Compatibility: The bonding strength of an adhesive can be influenced by the compatibility between the adhesive and the materials being bonded. Some adhesives may bond well to certain materials but perform poorly on others. It's essential to select an adhesive that is compatible with the specific materials you're working with.
- Surface Preparation: Proper surface preparation is critical for achieving optimal bonding strength. Surfaces should be clean, dry, and free of contaminants such as oil, grease, dust, and rust. Roughening or etching the surfaces can also improve adhesive adhesion by increasing the surface area for bonding.
- Application Method: Following the manufacturer's recommended application method is essential for achieving the desired bonding strength. Adhesives should be applied evenly and at the appropriate thickness to ensure proper contact between the adhesive and the substrate.
- Curing Time and Conditions: Adhesives typically require a certain amount of time to cure and develop their full bonding strength. Factors such as temperature, humidity, and curing conditions can affect the curing process and the final bonding strength of the adhesive.
Are there specific adhesives for heavy-duty applications?
When it comes to heavy-duty applications, there are specific adhesives designed to provide superior strength and durability. These adhesives are formulated to withstand high loads, impact, vibration, and harsh environmental conditions. Examples of adhesives for heavy-duty applications include structural adhesives, such as epoxy and polyurethane adhesives, which are commonly used in construction, automotive, and aerospace industries for bonding metals, composites, and other materials.
Before selecting an adhesive for heavy-duty applications, consider factors such as load requirements, temperature resistance, chemical resistance, and environmental exposure to ensure the adhesive can meet the demands of the specific application. Conducting thorough testing and evaluation of the adhesive's bonding strength under simulated conditions can help verify its suitability for heavy-duty use.
Sealant Curing Time
How long does it take for a sealant or adhesive to cure completely?
The curing time of sealants and adhesives varies depending on factors such as the type of product, environmental conditions, and the specific application. Generally, most sealants and adhesives will achieve initial cure within 24 hours, but complete curing may take several days or even weeks.
- Silicone sealants have an initial cure of 24 hours, with complete curing taking around 48 hours to 7 days, depending on factors such as temperature, humidity, and thickness of the sealant bead.
- Polyurethane sealants usually have a faster curing time, with initial cure occurring within 24 hours and complete curing taking 2 to 7 days, depending on the formulation and environmental conditions.
- Acrylic sealants typically have a shorter curing time compared to silicone and polyurethane sealants, with initial cure occurring within 12 to 24 hours and complete curing within 48 hours to 7 days.
When it comes to adhesives, curing time can vary widely depending on the type of adhesive and the materials being bonded. For example, cyanoacrylate (super glue) adhesives often achieve initial bond within seconds to minutes, but complete curing may take several hours.
Are there quick-curing options available for time-sensitive projects?
For time-sensitive projects where quick curing is essential, there are several options available:
- Rapid-curing formulations: Some sealants and adhesives are specifically formulated for quick curing, allowing for faster turnaround times on projects. These products may achieve initial cure within minutes or hours, significantly reducing waiting times.
- Accelerators: Certain adhesives can be used in conjunction with accelerators or activators to speed up the curing process. These additives promote faster bonding and curing, making them ideal for time-sensitive applications.
- UV-curable adhesives: UV-curable adhesives cure almost instantly when exposed to ultraviolet (UV) light, offering rapid bonding for a wide range of materials. These adhesives are commonly used in industries such as electronics, medical devices, and optics where fast assembly times are critical.
- Two-part adhesives: Two-part adhesives, such as epoxy resins, require mixing of two components before application. These adhesives often have a relatively short working time but can achieve rapid cure within minutes to hours, depending on the formulation.
When selecting a sealant or adhesive for a time-sensitive project, consider factors such as curing time, application method, and compatibility with the materials and environmental conditions of the project site. Conducting a small-scale test or trial run can help assess the performance and suitability of the product for the specific application.
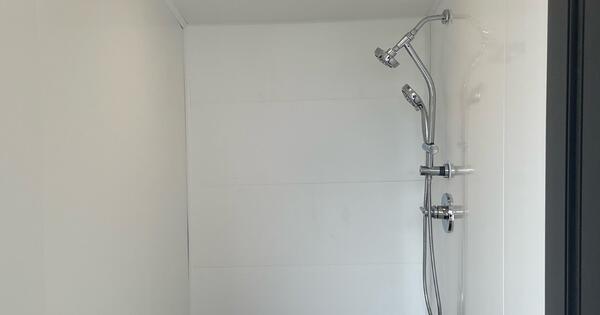
Waterproof Sealants for Trusscore Projects
When should I use sealant when installing Trusscore Wall&CeilingBoard?
When installing Trusscore Wall&CeilingBoard in high-moisture environments like bathrooms or shower enclosures, we recommend applying silicone along your Trusscore trims and on the tongue of each Trusscore Wall&CeilingBoard panel for extra protection. The bead of silicone should be no bigger than a string of yarn, and excess silicone can be wiped away once the panel is in place.
If you’re installing Snap-In J Trim along the bottom of the wall, we recommend drilling 1/4" holes into the bottom of the trim after it’s snapped into the Universal Base. Holes should be placed 16" apart.
We also recommend using a silicone sealant on all corners, around all fixtures, and to repair small holes. The best way to select a corresponding-colored silicone is to compare a sample of Trusscore to the color shown physically on the silicone tube at the store, because colors and brands will vary regionally.
What type of sealant should I buy for my Trusscore project?
If you’re shopping for silicone sealant in Canada, we recommend buying DAP Silicone Ultra Kitchen, Bath & Plumbing Sealant. In the U.S., buy DAP Commercial Kitchen 100% Silicone Sealant.
For more installation information, download the Trusscore Wall&CeilingBoard installation guide.
Sealant Removability
Can I easily remove and replace sealants if needed?
Removing and replacing sealants can be done, but the ease of the process depends on various factors such as the type of sealant used, the substrate it's applied to, and the extent of the application. Here's a breakdown:
- Type of Sealant: Silicone sealants tend to be more difficult to remove compared to acrylic or latex-based sealants. Silicone creates a strong bond with surfaces and forms a flexible, waterproof seal that can be challenging to remove without proper tools and solvents.
- Substrate: The type of material the sealant is applied to also influences how easily it can be removed. Sealants applied to porous or textured surfaces may adhere more strongly, making removal more challenging.
- Extent of Application: If the sealant is applied in a small, localized area, removal and replacement may be more straightforward. However, if the sealant covers a large surface area or is deeply embedded, it may require more effort to remove completely.
To remove sealants, you can follow these general steps:
- Start by using a utility knife or razor blade to carefully cut along the edges of the sealant to loosen it from the substrate.
- Use a sealant remover or solvent specifically designed for the type of sealant you're removing. Apply the solvent according to the manufacturer's instructions and allow it to penetrate the sealant for a sufficient amount of time to soften it.
- Once the sealant has softened, use a scraping tool or putty knife to gently pry and remove the softened sealant from the substrate. Be careful not to damage the surface underneath.
- Clean the surface thoroughly with soap and water to remove any remaining residue or solvent.
Are there sealants designed for temporary applications?
As for sealants designed for temporary applications, there are options available, particularly in the realm of removable or temporary caulks. These caulks are formulated to provide temporary seals that can be easily removed without damaging the substrate. They are commonly used for temporary repairs, seasonal sealing, or applications where the sealant needs to be removed or replaced frequently.
When selecting a sealant for temporary use, look for products labeled as “removable” or “temporary” and follow the manufacturer's recommendations for application and removal. Keep in mind that while temporary sealants offer easy removal, they may not provide the same level of durability or long-term performance as permanent sealants.
Sealant Compatibility with Materials
Are there sealants suitable for bonding or sealing specific materials like glass, plastic, or metal?
Yes, there are sealants specifically formulated for bonding or sealing a wide range of materials, including glass, plastic, metal, wood, and ceramics. These specialty sealants are designed to provide strong, durable bonds and effective seals on specific types of surfaces. Here's a breakdown of some common types of sealants and their applications:
- Glass Sealants: Silicone sealants are commonly used for bonding and sealing glass surfaces due to their excellent adhesion and flexibility. Specialty glass sealants may also be formulated with additives to enhance clarity and UV resistance, making them ideal for use in windows, aquariums, and glass showers.
- Plastic Sealants: Certain sealants are formulated specifically for bonding and sealing plastic surfaces, such as PVC, acrylic, and polycarbonate. These sealants typically have enhanced adhesion to plastic substrates and may contain additives to improve flexibility and resistance to UV degradation.
- Metal Sealants: Silicone, polyurethane, and epoxy sealants are often used for bonding and sealing metal surfaces such as aluminum, steel, and brass. These sealants provide excellent adhesion to metal substrates and offer protection against corrosion, weathering, and thermal expansion.
How do I avoid compatibility issues between sealants and surfaces?
To avoid compatibility issues between sealants and surfaces, consider the following tips:
- Surface Preparation: Proper surface preparation is essential for ensuring good adhesion between the sealant and the substrate. Clean the surfaces thoroughly to remove any dirt, dust, grease, or contaminants that may interfere with adhesion. Use a solvent or degreaser as needed, and roughen smooth surfaces with sandpaper or a wire brush to improve adhesion.
- Compatibility Testing: Before applying the sealant to the entire surface, conduct a compatibility test on a small, inconspicuous area to ensure it adheres well and does not cause any damage or discoloration. Allow the sealant to cure fully and test its adhesion and compatibility with the substrate under typical conditions.
- Select the Right Sealant: Choose a sealant that is specifically formulated for the type of surface you're working with. Read the manufacturer's instructions and product specifications carefully to ensure the sealant is suitable for the intended application and compatible with the substrate material.
- Consider Environmental Factors: Take into account environmental factors such as temperature, humidity, and exposure to UV radiation or chemicals, which can affect the performance and compatibility of the sealant. Choose a sealant that is designed to withstand the specific environmental conditions of your project site.
By following these guidelines and selecting the appropriate sealant for the materials and conditions of your project, you can minimize compatibility issues and ensure a successful bond or seal.
Sealant Mold and Mildew Resistance
Are there sealants with built-in resistance to mold and mildew?
Yes, there are sealants with built-in resistance to mold and mildew. These sealants are specially formulated with antimicrobial additives that help inhibit the growth of mold, mildew, and other fungi, making them ideal for use in damp or humid environments such as bathrooms, kitchens, and basements.
When choosing a mold-resistant sealant, look for products labeled as “mold and mildew resistant” or “antimicrobial.” These sealants typically contain ingredients such as fungicides or biocides that prevent mold and mildew growth on the surface of the sealant.
How can I prevent mold growth in areas where sealants are applied?
In addition to using mold-resistant sealants, there are several steps you can take to prevent mold growth in areas where sealants are applied:
- Proper Surface Preparation: Ensure that the surfaces to be sealed are clean, dry, and free of mold and mildew before applying the sealant. Remove any existing mold or mildew using a bleach solution or commercial mold remover and allow the surface to dry completely before sealing.
- Use Proper Ventilation: Adequate ventilation is essential for preventing mold growth in damp or humid areas. Install exhaust fans in bathrooms and kitchens to remove excess moisture from the air and ensure that ventilation ducts are clean and unobstructed.
- Seal Gaps and Cracks: Use mold-resistant sealants to seal gaps and cracks in walls, floors, and fixtures to prevent moisture infiltration and mold growth. Pay special attention to areas around sinks, tubs, showers, and windows where water can accumulate.
- Maintain Cleanliness: Regular cleaning and maintenance can help prevent mold growth in sealed areas. Clean bathroom and kitchen surfaces regularly with a mild detergent or vinegar solution to remove dirt, soap scum, and other organic matter that can promote mold growth.
- Monitor Humidity Levels: Use a hygrometer to monitor humidity levels in your home and take steps to reduce humidity if it consistently exceeds 60%. Use dehumidifiers or air conditioners to control indoor humidity levels and keep them within the recommended range.
By using mold-resistant sealants and following these preventive measures, you can effectively inhibit mold growth and maintain a clean and healthy environment in areas where sealants are applied.
Sealant for Interior vs. Exterior Applications
Are there differences between sealants designed for interior and exterior use?
Yes, there are significant differences between sealants designed for interior and exterior use. Interior sealants are typically formulated to withstand moderate temperature fluctuations and minimal exposure to moisture, while exterior sealants are engineered to withstand harsher environmental conditions, including UV exposure, temperature extremes, moisture, and weathering.
Here's a breakdown of the key differences between interior and exterior sealants:
- Weather resistance: Exterior sealants are formulated with additives that provide enhanced resistance to UV radiation, moisture, and temperature fluctuations. These additives help prevent cracking, fading, and deterioration caused by prolonged exposure to the elements.
- Flexibility: Exterior sealants are designed to accommodate greater movement and expansion and contraction of building materials due to temperature changes and settling. They typically have higher elongation and flexibility properties compared to interior sealants to maintain a durable, long-lasting seal under outdoor conditions.
- Durability: Exterior sealants are engineered to withstand the rigors of outdoor environments, including exposure to rain, snow, wind, and sunlight. They are formulated to resist mold, mildew, and other fungal growth and provide superior adhesion and longevity compared to interior sealants.
- Adhesion: Exterior sealants are formulated to adhere to a wide range of porous and non-porous surfaces commonly found in outdoor construction, including concrete, masonry, wood, metal, and vinyl. They often contain special adhesion promoters or primers to ensure strong, long-lasting bonds on challenging substrates.
What sealants are best for outdoor projects exposed to the elements?
When it comes to outdoor projects exposed to the elements, the best sealants are those specifically designed for exterior use. Silicone, polyurethane, and hybrid sealants are commonly used for outdoor applications due to their excellent weather resistance, durability, and flexibility. Here's a brief overview of the best sealants for outdoor projects:
- Silicone Sealants: Silicone sealants offer superior weather resistance and UV stability, making them ideal for outdoor sealing applications such as windows, doors, siding, and trim. They maintain flexibility over a wide temperature range and provide long-lasting protection against water infiltration and air leakage.
- Polyurethane Sealants: Polyurethane sealants provide excellent adhesion and durability in outdoor environments, making them suitable for sealing joints, cracks, and gaps in concrete, masonry, and other exterior surfaces. They are resistant to weathering, chemicals, and abrasion, making them ideal for high-traffic areas and heavy-duty applications.
- Hybrid Sealants: Hybrid sealants combine the best properties of silicone and polyurethane sealants to provide superior weather resistance, adhesion, and flexibility. They are versatile sealants that can be used for a wide range of outdoor sealing applications, including windows, doors, roofing, and siding.
When selecting a sealant for outdoor projects, consider factors such as the type of substrate, exposure to UV radiation and moisture, temperature fluctuations, and expected movement to ensure you choose the right sealant for the job. Additionally, proper surface preparation and application techniques are essential for achieving a durable, long-lasting seal in outdoor environments.
Clear vs. Colored Sealants
When should I use clear sealants, and when is it better to use colored ones?
Clear sealants are typically used when you want to maintain the natural appearance of the substrate or when transparency is desired. They are ideal for sealing surfaces where you want to showcase the material underneath, such as glass, natural stone, or wood. Clear sealants are often used in applications where aesthetics are important, such as sealing windows, doors, trim, and decorative elements.
On the other hand, colored sealants are preferred when you want to match or complement the surrounding surfaces or when you want to add a decorative touch to the project. Colored sealants are available in a wide range of hues to match common building materials such as brick, concrete, tile, and metal. They are commonly used for sealing joints, gaps, and cracks in areas where a seamless appearance is desired, such as around baseboards, countertops, and tile grout lines.
When choosing between clear and colored sealants, consider factors such as the visibility of the sealant, the desired aesthetic effect, and the compatibility with the surrounding surfaces. Here are some general guidelines:
- Clear Sealants: Use clear sealants when you want to maintain a transparent or natural look and when the substrate is visually appealing or decorative. Clear sealants are suitable for applications where the focus is on showcasing the material underneath, such as glass, stone, or wood.
- Colored Sealants: Use colored sealants when you want to match or complement the color of the surrounding surfaces or when you want to add a decorative accent to the project. Colored sealants can help create a seamless and cohesive appearance by blending with the surrounding materials or adding contrast and visual interest.
Can I find sealants in custom colors to match my project?
Many manufacturers offer a range of standard colors as well as custom color matching services. You can often request custom colors to match specific paint or substrate colors, allowing you to achieve a seamless and professional-looking finish. Keep in mind that custom color matching may involve additional lead time and cost, so it's essential to plan ahead and communicate your color requirements with the manufacturer or supplier.
Sealant Application Techniques
What tools are best for applying sealants and adhesives?
Achieving a clean and professional-looking seal requires the right tools and techniques. Here are some of the best tools for applying sealants and adhesives, along with specific techniques for achieving a neat finish:
- Caulking Gun: A caulking gun is essential for applying sealants and adhesives in a controlled manner. Choose a high-quality caulking gun with a smooth trigger action and a dripless design to prevent messy drips and waste.
- Applicator Tips: Applicator tips or nozzles can help control the flow of sealant or adhesive and apply it precisely to the desired area. Different nozzle sizes and shapes are available to accommodate various bead widths and application needs.
- Masking Tape: Masking tape can be used to create clean, straight lines and protect adjacent surfaces from excess sealant or adhesive. Apply masking tape along the edges of the joint or seam before applying the sealant, then remove it immediately after tooling for a crisp, professional-looking finish.
- Tooling Tools: Tooling tools such as caulking tools, spatulas, or wet fingers can be used to smooth and shape the sealant or adhesive for a neat finish. Wetting your finger with a soapy solution or denatured alcohol can help prevent the sealant from sticking and facilitate smoother tooling.
- Utility Knife or Razor Blade: A utility knife or razor blade can be used to cut the tip of the sealant cartridge and remove excess sealant after application. Make sure to use a sharp blade and exercise caution to avoid damaging the substrate.
Are there specific techniques for achieving a clean and professional-looking seal?
Here are some specific techniques for achieving a clean and professional-looking seal:
- Prepare the Surface: Clean and dry the surface thoroughly before applying the sealant or adhesive to ensure good adhesion and prevent contamination.
- Cut the Tip at a Slight Angle: Use a utility knife or razor blade to cut the tip of the sealant cartridge at a slight angle to create a small opening. This allows for better control of the flow and helps achieve a smooth bead.
- Apply a Consistent Bead: Hold the caulking gun at a 45-degree angle and apply a consistent bead of sealant or adhesive along the joint or seam. Keep steady pressure on the trigger to maintain a uniform bead width.
- Tool the Sealant: Immediately after applying the sealant, use a caulking tool, spatula, or wet finger to smooth and shape the sealant for a neat finish. Work quickly and methodically to avoid skinning or drying of the sealant.
- Remove Excess Sealant: Once the sealant has been tooled, use a utility knife or razor blade to remove any excess sealant or adhesive before it cures. Hold the blade at a shallow angle and carefully trim away the excess to create a clean edge.
- Remove Masking Tape: If masking tape was used, carefully remove it immediately after tooling to reveal clean, crisp lines. Pull the tape away at a 45-degree angle to prevent tearing or lifting of the sealant.
By using the right tools and techniques, you can achieve a clean and professional-looking seal or bond that enhances the appearance and performance of your project. Practice and attention to detail are key to mastering the art of sealant and adhesive application.
Sealant Compatibility with Paint and Stain
Can I stain or paint over surfaces that have been sealed?
Yes, you can stain or paint over surfaces that have been sealed, but it's essential to choose the appropriate sealant and follow proper preparation and application techniques to ensure a successful finish.
For surfaces that have been sealed with a clear sealant, such as silicone or polyurethane, staining or painting over the sealant may not be feasible or desirable, as these sealants typically create a waterproof barrier that prevents the absorption of stains or paints. In such cases, it's best to remove the sealant entirely before staining or painting the surface.
However, for surfaces sealed with a paintable sealant, such as acrylic or hybrid sealants, staining or painting over the sealed surface is possible with proper preparation. Here are some general guidelines to follow:
- Surface Preparation: Ensure the sealed surface is clean, dry, and free of any dirt, dust, or debris before painting or staining. If necessary, lightly sand the sealed surface to roughen it and improve adhesion.
- Priming: Apply a primer compatible with both the sealant and the paint or stain to promote adhesion and provide a uniform surface for painting or staining. Use a high-quality bonding primer designed for use on sealed surfaces.
- Painting or Staining: Once the primer has dried completely, you can proceed with painting or staining the surface using the desired finish. Follow the manufacturer's instructions for application and drying times, and apply multiple coats as needed to achieve the desired coverage and finish.
- Topcoat: To protect the painted or stained surface and enhance durability, consider applying a clear topcoat or sealer after the paint or stain has dried completely. Choose a topcoat compatible with the paint or stain and suitable for the intended use and environmental conditions.
Are there sealants that work well with both painted and unpainted surfaces?
As for sealants that work well with both painted and unpainted surfaces, acrylic and hybrid sealants are versatile options that adhere well to a wide range of substrates, including painted and unpainted surfaces. These sealants offer excellent adhesion, flexibility, and durability, making them suitable for a variety of sealing applications both indoors and outdoors.
When selecting a sealant for use with painted surfaces, ensure compatibility with the paint type and finish, and test the sealant in an inconspicuous area before full application to verify adhesion and compatibility. Follow the manufacturer's recommendations for surface preparation, application, and curing to achieve the best results and ensure long-lasting performance.
Sealant Safety Considerations
Are there safety precautions I should take when working with certain adhesives or sealants?
When working with adhesives or sealants, it's essential to take appropriate safety precautions to protect yourself from potential hazards. Here are some general safety guidelines to follow:
- Read the Manufacturer's Instructions: Always read and follow the manufacturer's instructions and safety recommendations provided on the product label or packaging. Pay attention to any specific safety precautions, handling instructions, or personal protective equipment (PPE) recommendations.
- Use in a Well-Ventilated Area: Work in a well-ventilated area to minimize exposure to fumes and vapors. Open windows and doors or use fans and exhaust ventilation to improve air circulation and remove airborne contaminants.
- Wear Appropriate PPE: Depending on the type of adhesive or sealant you're using, wear appropriate personal protective equipment (PPE) such as safety glasses, gloves, and a respirator or mask to protect against inhalation of fumes and skin contact.
- Avoid Skin Contact: Try to avoid direct skin contact with adhesives or sealants as much as possible. Wear gloves to protect your hands and avoid touching your face or other sensitive areas while working with these materials.
- Clean Spills Promptly: Clean up any spills or drips of adhesive or sealant immediately using a solvent or cleaner recommended by the manufacturer. Use absorbent materials such as paper towels or rags to blot up excess adhesive or sealant, then wipe the area with a clean cloth dampened with solvent.
- Dispose of Waste Properly: Dispose of unused adhesive or sealant according to local regulations and manufacturer's recommendations. Do not pour excess material down drains or sewers, as it may contaminate water sources or cause environmental damage.
What should I do if I accidentally get adhesive or sealant on my skin or clothing?
If you accidentally get adhesive or sealant on your skin or clothing, here's what you can do:
- Skin contact: Immediately wash the affected area with soap and water to remove any adhesive or sealant residue. Use a mild abrasive such as pumice or sugar to gently scrub away stubborn residues, then rinse thoroughly with water. If irritation or allergic reactions occur, seek medical attention.
- Clothing contact: Remove contaminated clothing as soon as possible to prevent further skin contact. Blot any excess adhesive or sealant with paper towels or a clean cloth, then launder the clothing following the manufacturer's instructions. Avoid using hot water or dryer heat, as it may cause the adhesive or sealant to set and become more difficult to remove.
By following these safety precautions and taking prompt action in the event of spills or accidents, you can minimize the risk of exposure to adhesives and sealants and ensure a safe and productive working environment.