This post was originally published in August 2025. Last updated: April 2026.
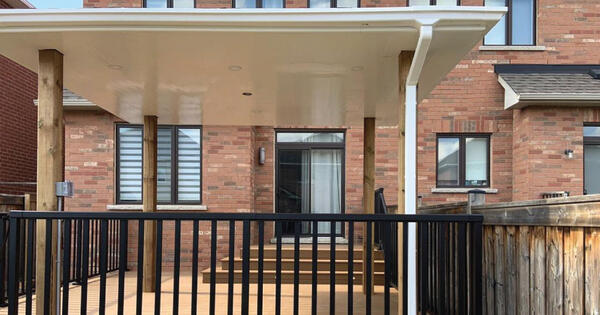
If you've got an elevated deck and unused space below it, you're leaving livable square footage on the table. Rain hits the deck boards, works through the gaps, and turns the area underneath into a damp, unusable mess. The fix is a two-part system: an under deck drainage system to capture and redirect water away from the joists, and a ceiling panel system to create a finished, weather-protected surface underneath. Get both components right and you've got a dry outdoor room—functional storage, a covered patio, a wet bar, whatever the space allows.
This guide covers everything you need to know: how under deck ceiling systems work, the difference between overmount and undermount drainage, the best ceiling materials compared side by side, realistic cost estimates, and design ideas for turning the space into something you'll actually use.


What Is an Under Deck Ceiling System?
An under deck ceiling system is a weatherproof surface installed on the underside of an elevated deck's framing. It works in combination with a drainage system to capture water that passes through the deck boards, channel it to the perimeter, and keep the space below completely dry. The ceiling panels themselves create the finished surface—covering the joists, hiding the drainage components, and providing the aesthetic you want for the space.
The two systems—drainage and ceiling—are designed to work together. The drainage layer sits above the ceiling panels (or integrates with the framing), collects rainwater, and routes it to a gutter at the deck's edge. The ceiling panels mount below, giving you a clean finished look while blocking wind, debris, and light moisture exposure. Neither system works as well on its own: drainage without a ceiling leaves exposed joists and no finished space; ceiling panels without drainage can trap moisture against the framing.
For a closer look at how Trusscore Wall&CeilingBoard performs in sheltered exterior applications, visit the sheltered exterior ceiling application page.
Under Deck Drainage Systems: Overmount vs. Undermount
Before you choose ceiling panels, you need to choose a drainage approach. There are two main types of under deck drainage systems, and the right one depends on your deck's construction and whether you're working with a new build or an existing structure.
Overmount Drainage Systems
Overmount systems—sometimes called above-joist systems—install between the deck boards and the structural joists. Troughs or channels collect water at the deck surface and funnel it to a perimeter gutter before it ever contacts the framing.
Here's what you need to know about overmount systems:
- How it works: Troughs or drainage channels are installed on top of the joists, below the deck boards. Water passes through the deck surface, lands in the channels, and drains to the perimeter.
- Pros: Completely protects the joists from moisture exposure. No drainage components visible from below, which creates a cleaner ceiling installation.
- Cons: Installation is more involved—ideally done during new construction or a full deck rebuild. Retrofitting requires removing deck boards.
- Cost range: $6 to $12 per square foot for materials alone.
- Best use case: New deck construction or full deck rebuilds where drainage can be integrated before decking boards go down.
Undermount Drainage Systems
Undermount systems—below-joist systems—install underneath the deck framing. Panels or troughs attach to the underside of the joists and slope toward a perimeter gutter, catching water that penetrates between the deck boards and directing it away from the space below.
Here's what you need to know about undermount systems:
- How it works: Sloped panels or channels attach directly to the underside of the joists. Water drips down from the deck boards, lands on the drainage panels, and follows the slope to a gutter at the edge of the deck.
- Pros: Can be retrofitted to an existing deck without removing the deck boards. Generally more accessible as a DIY project.
- Cons: Drainage components are located in the same plane as the ceiling, which can reduce headroom and complicate the ceiling installation. Sloped troughs may be partially visible depending on the ceiling design.
- Cost range: $4 to $9 per square foot for materials alone.
- Best use case: Existing decks where removing deck boards isn't practical. Also works well for homeowners looking for a straightforward DIY retrofit.
Which System Is Right for You?
The right drainage system depends on a few key factors. Use this framework to guide your decision:
- New build or deck rebuild: Go with an overmount system. You have access to the joists before the deck boards go down, and overmount systems provide superior moisture protection for the framing.
- Existing deck: An undermount system is usually the more practical choice. It can be installed from below without disturbing the deck surface.
- Budget: Undermount systems generally cost less to install on existing decks because there's no demolition involved. Overmount systems have higher upfront costs if retrofitting, but better long-term performance.
- Performance expectations: If you want the joists fully protected and maximum water management, overmount systems are the better investment. Undermount systems handle water effectively but leave joists more exposed to incidental moisture.
Drainage System Comparison
| System | How It Works | Pros | Cons | Cost/Sq. Ft. | Best For |
|---|---|---|---|---|---|
| Overmount | Channels above joists, below deck boards | Protects joists; clean ceiling | Best for new builds; harder to retrofit | $6 to $12 (materials) | New construction or full rebuild |
| Undermount | Sloped panels below joists | Retrofit-friendly; DIY accessible | Reduces headroom; some components visible | $4 to $9 (materials) | Existing decks |
Best Materials for Waterproof Under Deck Ceilings
Choosing the right ceiling material is as important as choosing the right drainage system. The material you install will be exposed to outdoor humidity, temperature swings, cleaning, and occasional splashback—so it needs to hold up. Here's how the most common options compare.
PVC Panels


PVC panels are the best-performing material for under deck ceilings. Trusscore Wall&CeilingBoard is 100 percent water-resistant and mold-resistant—exposure to rain, humidity, and splashback won't affect its performance or appearance. The tongue-and-groove interlocking system installs without taping, mudding, or finishing, and panels go up quickly. When silicone sealant is applied to the panel seams during installation, you get a water-resistant barrier across the entire ceiling surface regardless of the direction of moisture exposure.
Trusscore Wall&CeilingBoard panels are available in 8-, 10-, 12-, 14-, 16-, and 20-foot lengths, making them a practical fit for decks of any size. The panels are lightweight—40 percent lighter than drywall—which matters when you're working overhead. The smooth, non-porous surface cleans with soap and water, and can handle a pressure washer for heavier buildup. With a light reflectivity value of 0.90, white panels reflect 90 percent of available light, which brightens under-deck spaces that would otherwise feel dark and enclosed.
Cost range: $2.75 to $3.75 per square foot (materials only).
Vinyl Panels
Vinyl panels are a popular budget option for under deck ceilings. They're lightweight, widely available, and come in a range of colors and finishes. Vinyl handles moisture reasonably well—it won't rot or mold—but it can become brittle in cold climates and may fade or discolor with prolonged UV exposure. For covered applications with limited sun exposure, vinyl performs adequately. In colder regions or high-UV environments, durability becomes a concern over time.
Cost range: $1.50 to $3.00 per square foot (materials only).
Aluminum Panels
Aluminum offers solid durability and a clean, modern appearance. It resists rust, rot, and insect damage, and it holds up well in high-moisture environments. The downsides are that aluminum can dent more easily than PVC, color options are limited, and the metallic look doesn't suit every aesthetic. It's a reasonable mid-range choice for homeowners who want something more durable than vinyl without moving to premium PVC.
Cost range: $2.50 to $4.50 per square foot (materials only).
Steel Panels
Steel panels provide excellent structural strength and long-term weather resistance, but they come with trade-offs. Steel is heavier than other ceiling materials, which complicates overhead installation—this is usually a two-person job requiring proper scaffolding or staging. Color and finish options are limited, and the upfront cost is higher than vinyl or aluminum. Steel makes the most sense for heavy-duty applications or industrial-style spaces where strength is the top priority.
Cost range: $3.50 to $6.00 per square foot (materials only).
Wood Panels
Wood offers a natural, warm aesthetic that suits traditional and craftsman-style homes. The challenge is maintenance: wood requires regular sealing, staining, or painting to stay waterproof, and it's susceptible to rot, mold, and insect damage if that upkeep lapses. High-quality treated wood can hold up reasonably well, but the ongoing maintenance burden is significant compared to PVC or aluminum. For homeowners who want the wood look without the maintenance, PVC panels in a wood-grain profile are worth considering as an alternative.
Cost range: $1.00 to $5.00 per square foot (materials only), depending on wood species and treatment.
Ceiling Material Comparison at a Glance
| Material | Moisture Resistance | Durability | Maintenance | Cost/Sq. Ft. | Best Use Case |
|---|---|---|---|---|---|
| PVC (Trusscore Wall&CeilingBoard) | Excellent (100% waterproof) | Excellent | Very low (pressure-washable) | $2.75 to $3.75 | All under deck applications |
| Vinyl | Good | Moderate (cold brittleness) | Low | $1.50 to $3.00 | Budget builds; mild climates |
| Aluminum | Very good | Good | Low | $2.50 to $4.50 | Modern aesthetics; mid-budget |
| Steel | Very good | Excellent | Low | $3.50 to $6.00 | Heavy-duty or industrial spaces |
| Wood | Low (requires treatment) | Low to moderate | High (regular sealing) | $1.00 to $5.00 | Traditional aesthetics; dry climates |
How Much Does an Under Deck Ceiling System Cost?
The total cost of an under deck ceiling system varies based on the drainage approach you choose, the ceiling material, the size of your deck, and whether you install it yourself or hire a contractor. Here's a realistic breakdown to help you plan your budget.
Total System Cost Ranges
Most under deck ceiling projects—drainage system plus ceiling panels—fall within the following ranges for total installed cost:
- Basic undermount drainage + vinyl panels: $15 to $22 per square foot installed.
- Undermount drainage + PVC panels: $18 to $28 per square foot installed.
- Overmount drainage + PVC panels: $22 to $40 per square foot installed (new construction pricing).
Cost Breakdown
Here's where the money goes on a typical project:
- Materials (drainage system): $4 to $12 per square foot depending on whether you choose undermount or overmount.
- Materials (ceiling panels): $1.50 to $3.75 per square foot depending on material choice.
- Labor: $6 to $15 per square foot for a professional installation. Labor costs vary significantly by region and project complexity.
- Perimeter gutters and downspouts: $200 to $600 for a typical project, depending on deck perimeter length.
- Trim and fasteners: $0.50 to $1.00 per square foot.
DIY vs. Professional Installation
Both drainage systems and PVC ceiling panels are accessible to experienced DIYers. A few considerations:
- DIY savings: Eliminating labor costs can save $6 to $15 per square foot, which adds up quickly on a 300 to 500 square foot deck.
- DIY suitability: Undermount drainage systems and tongue-and-groove PVC ceiling panels are the most DIY-friendly combination. The interlocking panel system doesn't require special tools or finishing steps.
- When to hire a pro: Overmount drainage systems on new builds, large multi-level decks, or complex drainage configurations benefit from professional installation to ensure proper slope and water management.
Long-Term Value
Upfront cost is only part of the picture. A PVC panel ceiling requires virtually no maintenance over its service life—no repainting, no resealing, and no mold remediation. Compared to wood or vinyl alternatives that require periodic upkeep, the total cost of ownership over ten or twenty years typically favors PVC. Trusscore Wall&CeilingBoard delivers 55 percent lower total cost of ownership compared to drywall when installation, maintenance, and longevity are factored in—and the same logic applies in exterior sheltered applications.
Design Ideas for Your Under Deck Space
Once you've got a dry, finished ceiling in place, you've got options. The space under an elevated deck can serve a surprising range of functions—what you do with it depends on your lifestyle, your lot, and how much you want to invest in the finish.
Outdoor Living Area
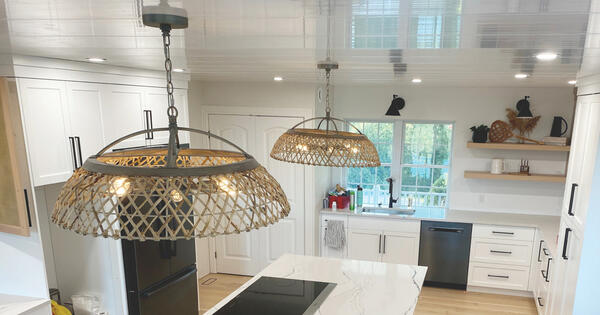
A covered ceiling transforms a soggy, underused area into a genuine outdoor room. Add weather-resistant furniture, an outdoor rug, and string lights or recessed fixtures overhead and you've got a covered patio that's usable through rain. The high reflectivity of white PVC ceiling panels works in your favor here—a bright ceiling makes a low-clearance space feel larger and reduces how much artificial lighting you need after dark.
Finished Ceiling Aesthetics
Modern under deck ceiling systems don't have to look like an afterthought. A few design directions worth considering:
- Clean white PVC: Crisp, bright, and low-maintenance—the most popular choice for contemporary and transitional homes.
- Gray PVC: A warmer neutral that complements natural wood decking and modern exterior color palettes.
- Integrated lighting: Recessed fixtures cut directly into PVC panels for a streamlined look. The panel's high reflectivity means fewer fixtures cover more space.
- Ceiling fans: A fan with integrated lighting handles both comfort and illumination. Make sure the deck framing can support the fan's mounting hardware before installation.
- Decorative trim: Finished perimeter trim gives the ceiling a polished, intentional appearance that ties into the deck's overall aesthetic.
Maintenance Tips for Under Deck Ceilings
A well-installed under deck ceiling system is low-maintenance by design, but some basic upkeep keeps it performing well for the long term.
Routine Cleaning
Sweep or hose down the ceiling surface seasonally to remove debris, dust, and organic buildup. For PVC and aluminum panels, a mild soap solution and soft brush work well for more thorough cleaning. PVC panels can also handle a pressure washer—use a wide-angle nozzle and keep it moving to avoid concentrating pressure in one area. Avoid abrasive cleaning pads on any panel surface.
Drainage System Upkeep
Clear gutters and downspouts at least twice a year—spring and fall—to prevent clogs that can back up water into the drainage system. After heavy storms, check that downspouts are clear and water is flowing to the intended drainage point. For undermount systems, inspect the drainage panels or troughs for debris buildup that could impede flow.
Periodic Inspections
Once a year, inspect the ceiling panels and drainage system for signs of damage, loose fasteners, or compromised sealant at seams and perimeter trims. Catching a minor issue early—a loose panel, a cracked sealant bead—prevents it from becoming a larger problem. For wood ceilings, check for rot, mold, and delamination and reseal or restain as needed to maintain moisture protection.
Material-Specific Notes
Different materials have different maintenance demands. Here's a quick reference:
- PVC: Soap and water for routine cleaning and pressure-washable for heavier buildup. No painting, sealing, or finishing required.
- Aluminum: Mild detergent and water; avoid abrasive cleaners that can scratch the finish.
- Vinyl: Soft cloth and mild soap solution and rinse thoroughly. Inspect for brittleness in cold climates.
- Wood: Clean with a wood-safe cleaner and reseal or restain every one to three years to maintain moisture resistance. Monitor for rot and insect damage.
FAQ
What Is the Best Material for an Under Deck Ceiling?
PVC panels are the best material for under deck ceilings in most applications. They're 100 percent waterproof, mold-resistant, and require almost no maintenance. They install faster than any alternative and hold up in high-humidity, outdoor conditions without degrading, repainting, or resealing. For homeowners who want the best long-term performance, Trusscore Wall&CeilingBoard is the leading option in this category.
How Much Does an Under Deck Drainage System Cost?
Under deck drainage system costs depend on the system type. Undermount systems typically run $4 to $9 per square foot for materials, making them accessible for DIY installs on existing decks. Overmount systems cost $6 to $12 per square foot for materials but offer better long-term moisture protection for the framing. Add labor costs of $6 to $15 per square foot for professional installation.
How Do You Waterproof the Underside of an Existing Deck?
To waterproof the underside of an existing deck, follow these steps:
- Assess the deck framing. Check the joists for any existing rot or damage and address it before installing new components.
- Choose an undermount drainage system. Since you can't access above the deck boards, an undermount (below-joist) drainage system is the right choice for most existing decks.
- Install the drainage panels or troughs. Attach the drainage system to the underside of the joists according to the manufacturer's instructions, ensuring proper slope toward a perimeter gutter.
- Install perimeter gutters and downspouts. Route water away from the foundation and any areas where pooling would cause problems.
- Install ceiling panels. Attach waterproof ceiling panels—PVC is the best choice—to the underside of the drainage framing or directly to the joists.
- Seal seams and trim. Apply silicone sealant to panel seams, perimeter trims, and any penetrations to complete the water-resistant barrier.
Is Underdecking Worth It?
Yes, underdecking is worth it for most elevated decks. It transforms unused, weather-exposed space into a functional dry zone—whether for storage, outdoor living, or a covered workspace. The return on investment comes from added livable square footage, extended deck structure lifespan (by protecting framing from moisture), and increased resale value. Quality materials like PVC ceiling panels keep maintenance costs low over the life of the system. For more ideas on maximizing outdoor and sheltered ceiling applications, see the full gallery of completed projects.
A waterproof under deck ceiling system is a two-part investment: drainage and ceiling panels working together. The drainage system—overmount or undermount depending on your deck and budget—handles water management. The ceiling material determines long-term durability, maintenance burden, and the appearance of the finished space.
PVC panels outperform every other ceiling material in moisture resistance, durability, and ease of maintenance for under deck applications. They don't require painting, sealing, or finishing, and they hold up in demanding outdoor conditions year after year. When you're choosing a ceiling material that will be exposed to outdoor humidity, seasonal temperature swings, and regular cleaning, that durability gap matters.
Ready to plan your project? Explore Trusscore Wall&CeilingBoard for full specifications, available lengths, and color options. Then use the Trusscore Cost & Materials Estimator to calculate how many panels and trim pieces your deck ceiling requires, and find a retailer near you to get your project moving.