When it comes to our homes, there's no room for unwanted guests — especially not the sneaky intruder known as mold. It's a common issue that often hides in plain sight, wreaking havoc on our indoor air quality and overall well-being. Fear not. In this blog post, we unravel the mysteries of mold infestations within your walls and ceilings and arm you with the knowledge you need to take action. Let's dive in.
Identifying the Signs of Mold Infestation
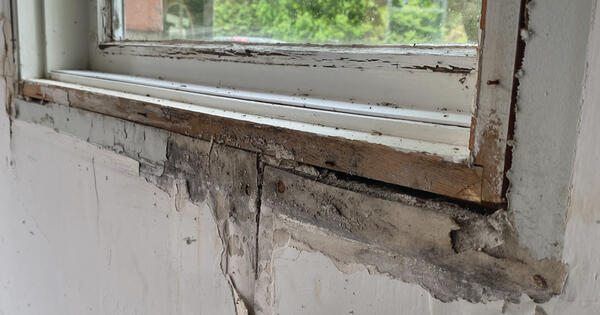
Detecting mold growth on interior walls and ceilings is crucial for early intervention. Water damage, in general, is the first step in mold growth. Whether it’s from leaky roofs, faulty plumbing, and poor ventilation, these are common signs of water damage to look out for on painted drywall:
- Water Stains: Water stains or discoloration on walls, ceilings, or floors might indicate a moisture problem that could lead to mold growth.
- Peeling or Cracked Paint: Paint that is peeling, cracking, or bubbling might be a sign that moisture is affecting the wall, which could promote mold growth underneath the surface.
- Warped or Bulging Surfaces: Walls or ceilings that are bowed, bulging, or have an uneven surface might be a result of water damage and could provide a conducive environment for mold.
- Condensation: Excessive condensation on walls, windows, or mirrors can create a moist environment suitable for mold growth.
You should attempt to fix water damage on drywall as soon as you notice it. However, water damage can go undetected, leaving mold to take hold in your interior wall or ceiling. If this has happened, here are some signs of mold growth to look out for:
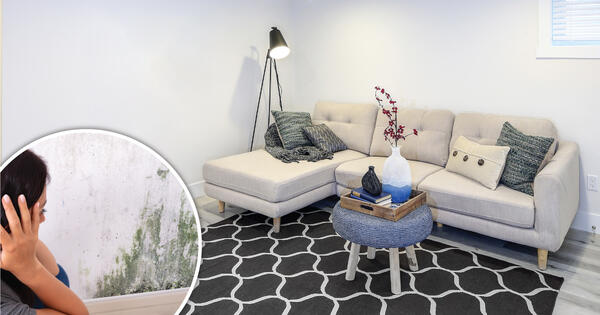
- Visible Discoloration: Mold often appears as black, green, brown, or white patches on walls. It can have a fuzzy, velvety, or slimy texture.
- Musty Odor: A strong, musty or earthy smell in a certain area can be indicative of mold growth. If you notice a persistent unpleasant odor, investigate further.
- Allergic Reactions or Respiratory Symptoms: If occupants in the vicinity experience an increase in allergic reactions, such as sneezing, coughing, or nasal congestion, or if there's an unexplained worsening of respiratory symptoms, it could be due to mold presence. Pets can also show allergic reactions or unusual health issues if there's mold growth in the home.
- High Humidity: If the humidity level in your home is consistently high (above 60%), it increases the likelihood of mold growth.
- Recent Water Damage: If an area has experienced recent water damage, such as leaks, flooding, or plumbing issues, it's more prone to mold growth.
- Unexplained Increase in Energy Bills: In some cases, mold growth might result in insulation becoming less effective, leading to higher heating or cooling costs.
If you suspect mold growth based on these signs, it's important to investigate further. Addressing mold promptly is crucial for preventing further damage to your home and potential health risks. If you're unsure about the extent of the mold growth, how to handle it, or if the mold covers more than 10 square feet of your wall or ceiling, consider seeking help from a professional mold remediation specialist.
Gathering the Necessary Tools and Materials for Mold Remediation
Now that we've cracked the mold code, let's gear up for the mission. Here’s a list of safety equipment and mold removal items and tools you’ll likely need to minimize exposure and make mold-fighting easier:
- Gloves
- Goggles
- N95 respirator mask
- Plastic sheets
- Duct tape
- Scrub brush or scrubbing pad
- Non-ammonia detergent, dish soap, or specialized mold cleaner
- Water
- Bucket
- Fans or dehumidifiers
- Vacuum cleaner with HEPA filter
- Plastic bags for disposal
- Bleach (optional, for non-porous surfaces)
- Hydrogen peroxide (optional, for porous surfaces)
How to Remove Mold from Inside Walls on a Step-By-Step Basis
Ready to remove the mold from your space? Let's go step by step:
- Put on Your Safety Gear: You’ll need gloves, goggles, and an N95 respirator mask to protect yourself from mold spores and cleaning products.
- Ventilate the Area: Fresh air is your ally, so set up proper ventilation to keep the air moving. Ensure the area is well-ventilated by opening windows and doors. If possible, place a fan next to the open window to help blow air outside.
- Isolate the Area: Seal off the affected area using plastic sheets and duct tape to prevent mold spores from spreading to other parts of your home and cover nearby furniture and items with plastic sheets to prevent contamination.
- Remove Loose Mold: Use a vacuum cleaner with a HEPA filter to gently vacuum the affected area, removing loose mold spores from the surface.
- Prepare Your Cleaning Solution: Mix a solution of water and non-ammonia detergent, dish soap, or a specialized mold cleaner according to the manufacturer's instructions.
- Scrub the Mold: Dip a scrub brush or scrubbing pad into the cleaning solution. Gently scrub the mold-infested surface, applying moderate pressure to remove the mold. Avoid excessive scrubbing, as it can release more spores into the air.
- Rinse and Dry: Use a clean cloth dampened with water to rinse the cleaned area. Dry the area completely using fans or dehumidifiers. Mold thrives in damp environments, so thorough drying is crucial.
Once you’ve rinsed and dried the affected area, you can take an extra, optional step to help disinfect the area and prevent future mold growth:
- For a non-porous surface, mix a solution of one part bleach to ten parts water. Apply the bleach solution to the cleaned area. Allow the solution to sit for about 15 minutes before rinsing and drying the area.
- For a porous surface, apply 3% hydrogen peroxide directly to the moldy area and let it sit for 10 minutes. Scrub gently with a brush, rinse, and dry thoroughly.
When complete, dispose of any cleaning materials, cloths, and brushes used in a sealed plastic bag to prevent spores from spreading.
Preventing Mold Growth in Your Home
To safeguard your home against future mold invasions, make sure to do the following:
- Address leaks promptly — whether from roofs, plumbing, or windows — and fix any cracks in walls, ceilings, and windows to prevent moisture seepage.
- Maintain indoor humidity levels below 50% to discourage mold growth, and consider using dehumidifiers in your space, especially in damp areas like basements.
- Regularly clean and inspect vents, ensuring proper airflow, and use exhaust fans in kitchens and bathrooms to reduce moisture buildup
- Routinely examine areas prone to mold growth, such as bathrooms and basements, and swiftly address any new signs of moisture or discoloration.
Protect Your Home from Mold by Installing a Mold-Resistant Drywall Alternative
Ultimately, the best way to fight mold is by installing a wall and ceiling solution that gives it nowhere to grow. That’s why it’s important to install waterproof wall and ceiling panels like Trusscore Wall&CeilingBoard instead of drywall in humid areas of your home, like bathrooms and laundry rooms, and in areas prone to water damage, like basements and garages.
Trusscore Wall&CeilingBoard is a non-porous, PVC-based wall and ceiling panel that is 100% moisture and water-resistant. Unlike drywall, Trusscore is designed to shed water and install with a watertight seal, preventing moisture and water from seeping into your wall or ceiling. Plus, panels are antimicrobial, so they’ll never grow mold or mildew. Make the switch from drywall to Trusscore Wall&CeilingBoard today by finding a retailer near you — your future self will thank you.